This example of group operations uses an experiment in which 18 samples of human PBMC were stained with two combinations of antibodies, collected over a series of days. How might this data be organized?
The stain combinations are listed by panel in the table below.
| Panel . | APC-Ax700 . | APC-H7 . | APC-Ax647 . | Viability Dye . | FITC . | PE . | PE Cy5.5 . | PE-Cy7 . |
| 1 | CD3 | CD19 | 2H2 | 7 AAD | CD32 | CD86 | CD209 | CD14 |
| 2 | CD4 | CD8 | 2H2 | 7 AAD | CD56 | CD11c | CD3 | CD45RO |
Initially we’ll want to group the data based on the combinations of antibodies. Dividing the data up this way will allow us to apply gates to samples with a uniform set of parameters, and avoid for example placing a gate on APC-Ax700 that is appropriate for the samples stained with CD3, but inappropriate for the samples stained with CD4. The ‘Create Group’ button (shown below) within the Navigate band of the FlowJo Ribbon can be used to create a new group. When you click this, the Group Creation Dialog window opens and allows you to define group membership based on various criteria.

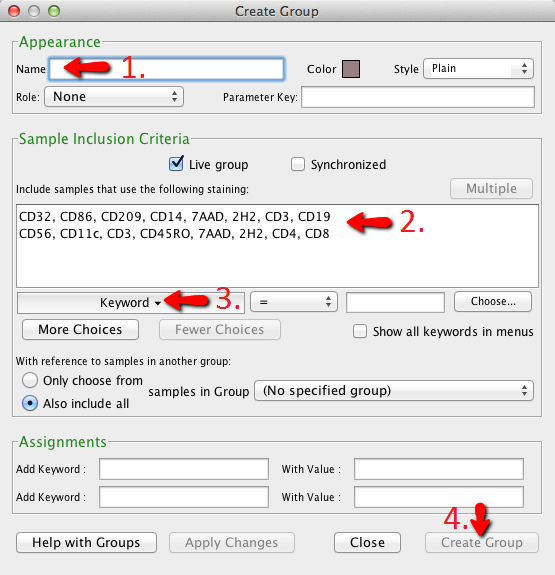
The figure below shows the most important parts of the group creation dialog. Arrow 1 points to the group name. The minimum requirement for creating a new group is that it has a name. Nothing else is required, but we’re going to work more efficiently in this example. Arrow 2 points to the first of two lists of antibody panels within the data loaded into FlowJo. These values are mined from the keywords in the FCS files. In the figure below, the first panel has been clicked on. If you then click ‘Create Group’ (Arrow 4), a group will be created that contains only files with that combination of antibodies.
After creating that initial group, the Group Creation Dialogue remains open. You can create another group at this point. In this example we would like to make a group for the second panel of antibodies; we can do so by clicking on that list, then clicking ‘Create Group’ again.
Lastly, we may want to sort the data in some other manner. In this example, we can imagine that we would like to sort samples collected at earlier time points from samples collected at later time points. Arrow 3 points to the ‘Keyword’ portion of the Group Creation Dialogue.

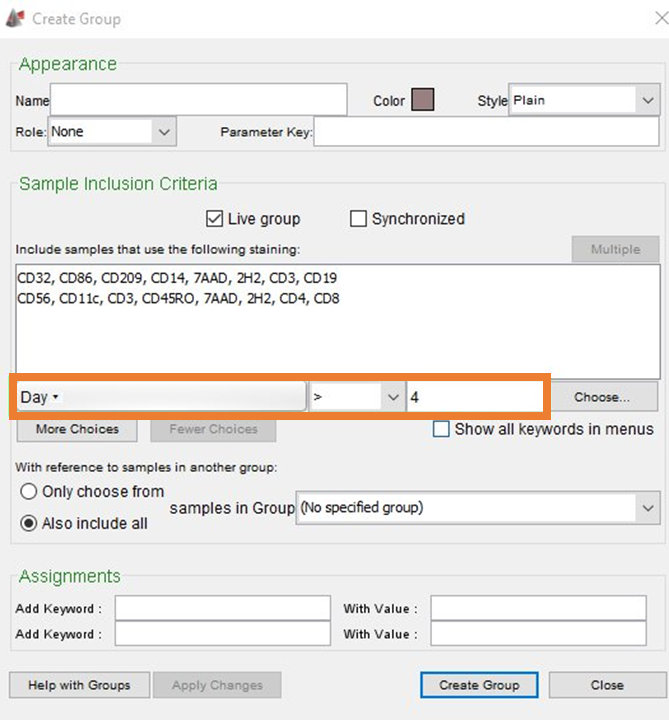
From the ‘Keyword’ box, we can select a specific keyword, use the adjacent qualifier box to set the constraints on that keyword, and then type in a value to use as an assessment in the text field to the right. In this example I have selected the keyword ‘Day”, the qualifier ‘greater than’, and entered the value of ‘4’. Once I click Create Group, I’ll have created a third group that isolates the files from time points > day 4.
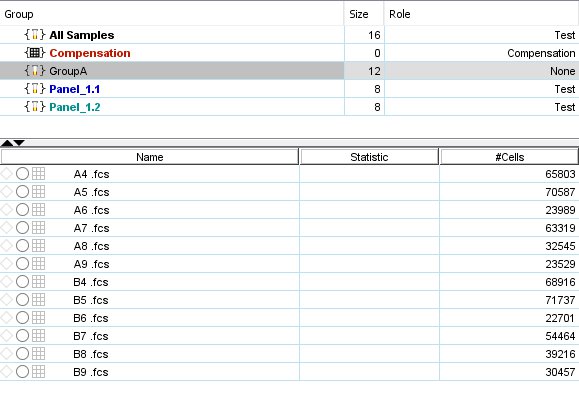
The completed set of groups is shown in the figure below. Along with ‘All Samples’ and ‘Compensation’, observe that I have created three additional groups. The ‘Panel 1.1’ and ‘Panel 1.2’ groups each have been assigned half of the samples based on the antibodies they were stained with, and the ‘Group A’ group was assigned all of the files from time point > 4 days which = 12. There is much more group based functionality in FlowJo but this is a common use case that might help expedite your workflow.


Figure 1. Groups listed in the Group panel of the Workspace
