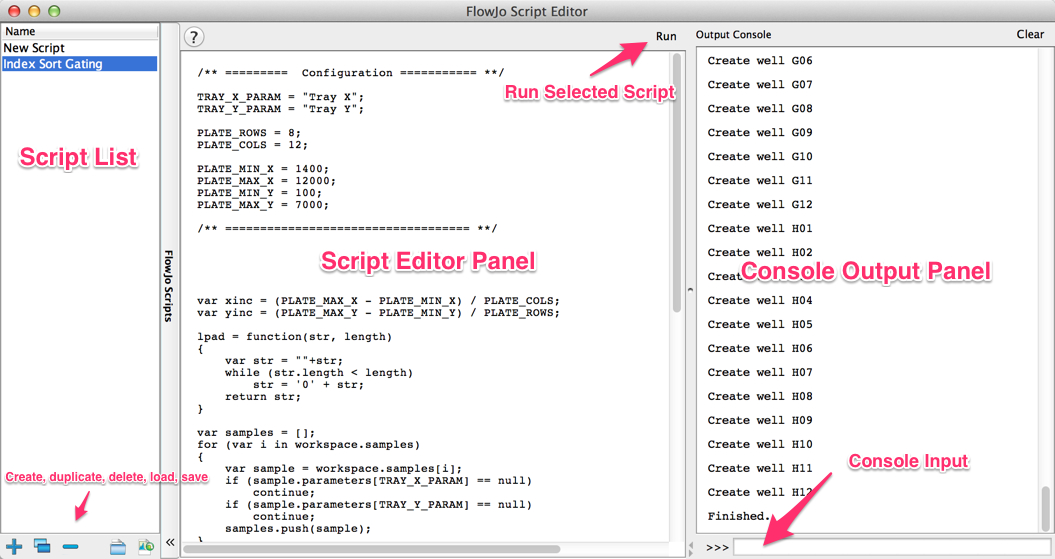
The Script Editor is a platform that allows the user to program their own routines into FlowJo using JavaScript without having to worry about compiling a program.
The script editor allows low-level access to FlowJo, and uses JavaScript to execute some powerful operations. The editor can be found by default in the Cytometry band on the Workspace Tab.

Scripts can be saved, copied, and shared.
Below is a simple tutorial to guide you through the key features of the scripting interface.
The Script Editor Interface

Console Input
The Script Editor’s console input provides a quick way to test code snippets, perform calculations, and view doc pages for FlowJo objects.
To perform simple calculations, simply type them into the console input and press enter. To navigate previously typed commands, use the up and down arrows. Mac OSX provides basic Emacs bindings to text fields, so shortcuts Ctrl-A and Ctrl-E move the cursor to the beginning and end respectively of the input line.
From here, example javascript commands which can be entered into the console input will be in blue
Examples:
500/499
= 1.002004008016032
math.sin(math.PI/3)
= 0.8660254037844386
Defining Variables
Variables are defined just as in standard javascript.
var a = 2 + 2;
var name = "NK Cells";
var population = name + a;
console.log("Population name is " + population);Navigating the workspace
Every script starts with a workspace object defined at the global scope. From this you have access to the workspace’s samples and groups.
var samples = workspace.samples;
samples.length
= number of samples in the workspace
samples.names
= names of all samples in workspace
workspace.groups.names
= names of all sample groups in workspace
var exp1Group = workspace.groups['Exp. 1']
exp1Group.samples.names
= names of all samples in the group Exp. 1
var myGroup = workspace.groups.create("My Group");myGroup.add(workspace.samples.slice(0, 10, 2));
var sample1 = exp1Group.samples[0];
= first sample in the Exp. 1 group
var sampleA1 = exp1Group.samples['A1.fcs'];
= the sample named A1.fcs in the Exp. 1 group
Inline Help & Object Documentation
To view functions and properties for FlowJo objects within the scripting console, simply access their ‘help’ property
Examples:
workspace.help
var samples = workspace.samples;
samples.help
var firstSample = samples[0];
firstSample.help
math.help
stats.help
Sample Keywords
The script editor has the ability to read and write keywords within the sample.
Note that FlowJo never modifies the original sample. Any keyword modifications will only be remembered within the context of the current workspace.
var fil = sampleA1.keywords['$FIL'];
var withoutExt = fil.substring(0, fil.lastIndexOf('.'));sampleA1.keywords['Custom Keyword'] = withoutExt;
sample.keywords[‘PATIENT_ID’] = filename.substring(4, 8);
Sample Parameters
A sample’s parameter info is stored under its parameter property.
var sample = workspace.samples[0];
= select first sample in workspace
sample.parameters.names
= names of all parameter within the sample
var fscParam = sample.parameters[1];
 = the sample's first parameter (here we are presuming it to be FSC).  Note
that parameter indices are one-based, in order to correspond with the FCS parameter keywords.
fscParam.name
= "FSC"
fscParam.help
= available properties for the parameter
fscParam.stain
= The parameter's secondary or 'stain' name. For FSC on most cytometers, this will be empty.
Traversing The Gating Tree
The Script Editor’s syntax is optimized to select corresponding populations across many samples simultaneously. Previously we have used the workspace.samples property to access samples loaded into the current workspace. To the Script Editor, this is a special type of list which supports searching and filtering of the entire gating tree. Populations are referenced as paths, much like files on a computer’s hard drive.
Examples:
var samples = workspace.samples;
var live = samples.populations("Live");= all first level Live cell gates in the workspace
var tcells = samples.populations("Live/Singlets/Lymphocytes/T Cells");= all T Cells gates in the workspace, assuming a gating tree like that in the FlowJo Advanced Tutorial
Wild cards may be used to avoid specifying sections of the search path. For example to find all T Cells gates childed to Lymphocytes gates, you could use the deep-wildcard operator “**”
var tcells = samples.populations("**/Lymphocytes/T Cells");While the “**” (double-star) operator may search any number of levels deep to find populations, the “*” (single-star) operator is used as a wild for a single gating level. It is useful to select all direct children of a population:
var tcellsSubgates = tcells.populations("*");= All direct child gates of the previously selected T Cells populations.
Note that all the previous search techniques are available for individual samples or sample groups within the workspace.
var sample1 = workspace.samples[0];
var tcells = sample1.populations("**/Lymphocytes/T Cells");var exp1Samples = workspace.groups['Exp. 1'].samples;
= All samples within the Exp. 1 group
var exp1Lymphs = exp1Samples.populations("**/Lymphocytes");Annotate based on statistical characteristics:
var important = median_CD4 > threshold && cd4_pos.count > 200;
sample.keywords[‘IMPORTANT’] = important;
Creating Gates
Statistic-Tethered Gating: Allows you to bind a gate to statistics from another population, from another sample, or from an aggregate across many samples.
var rectangle_gate = population.gating.rectangle(“Tethered”, “PE-A”, “FITC-A”);
rectangle_gate.minX = mean_median_PE * 1.5;
rectangle_gate.maxX = percentile_80_PE + 100;
rectangle_gate.minY = control_FITC_neg_thresh;
rectangle_gate.maxY = median_PECy55 * 2;
