The BD CellView™ Lens plugin for FlowJo™ v10 provides the complete set of tools for visually exploring the image data captured and exported from the BD FACSDiscover™ S8 cell sorter.
The CellView™ plugin allows for interactive exploration of the FCS files and associated image files collected using the BD FACSChorus™ acquisition software. BD FACSChorus™ stores images associated with specific cells in a compressed format, Chorwave (CVW). For analysis, the images must be extracted from the compressed file which can be done using the BD CellView™ Image Extractor, installed either locally or used as a service in the BD Research Cloud. The images will be extracted as TIFF files.
The BD CellView™ Lens plugin can be download from the FlowJo Exchange. Note that version 1.2.3 and later were updated to connect with FlowJo version 10.10. If you have an earlier version of FlowJo, please download one of the previous versions from the same page. Instructions for installing plugins are available here.
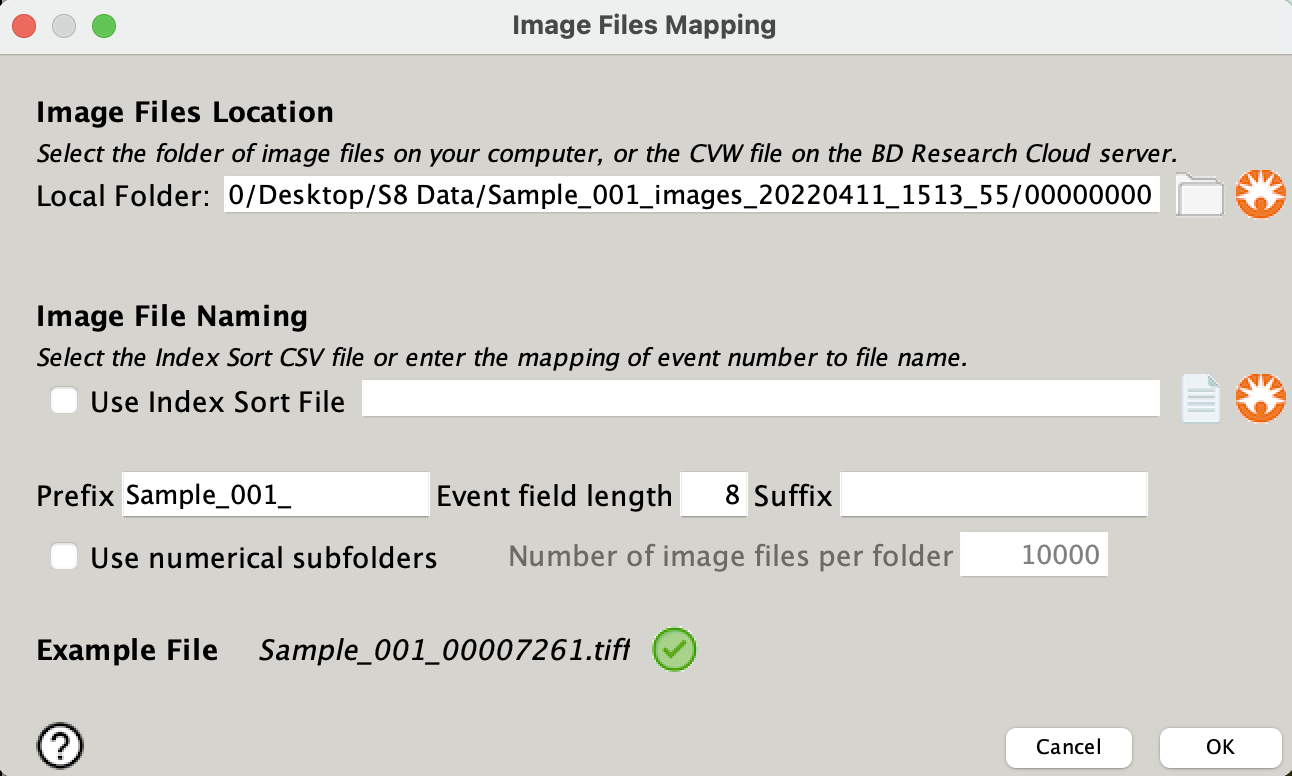
To start using the BD CellView™ Lens plugin, load your FCS sample file into a workspace and analyze the data as you normally would to identify populations of interest. Select a population, then choose the BD CellView™ Lens plugin from the Workspace –Plugins menu to create a plugin node for that population. The first use of the plugin in a workspace pops open the Event to Image File Mapping dialog box.

Once images have been linked you will notice that a new node with a camera lens icon displays below the selected population.

Image Browser
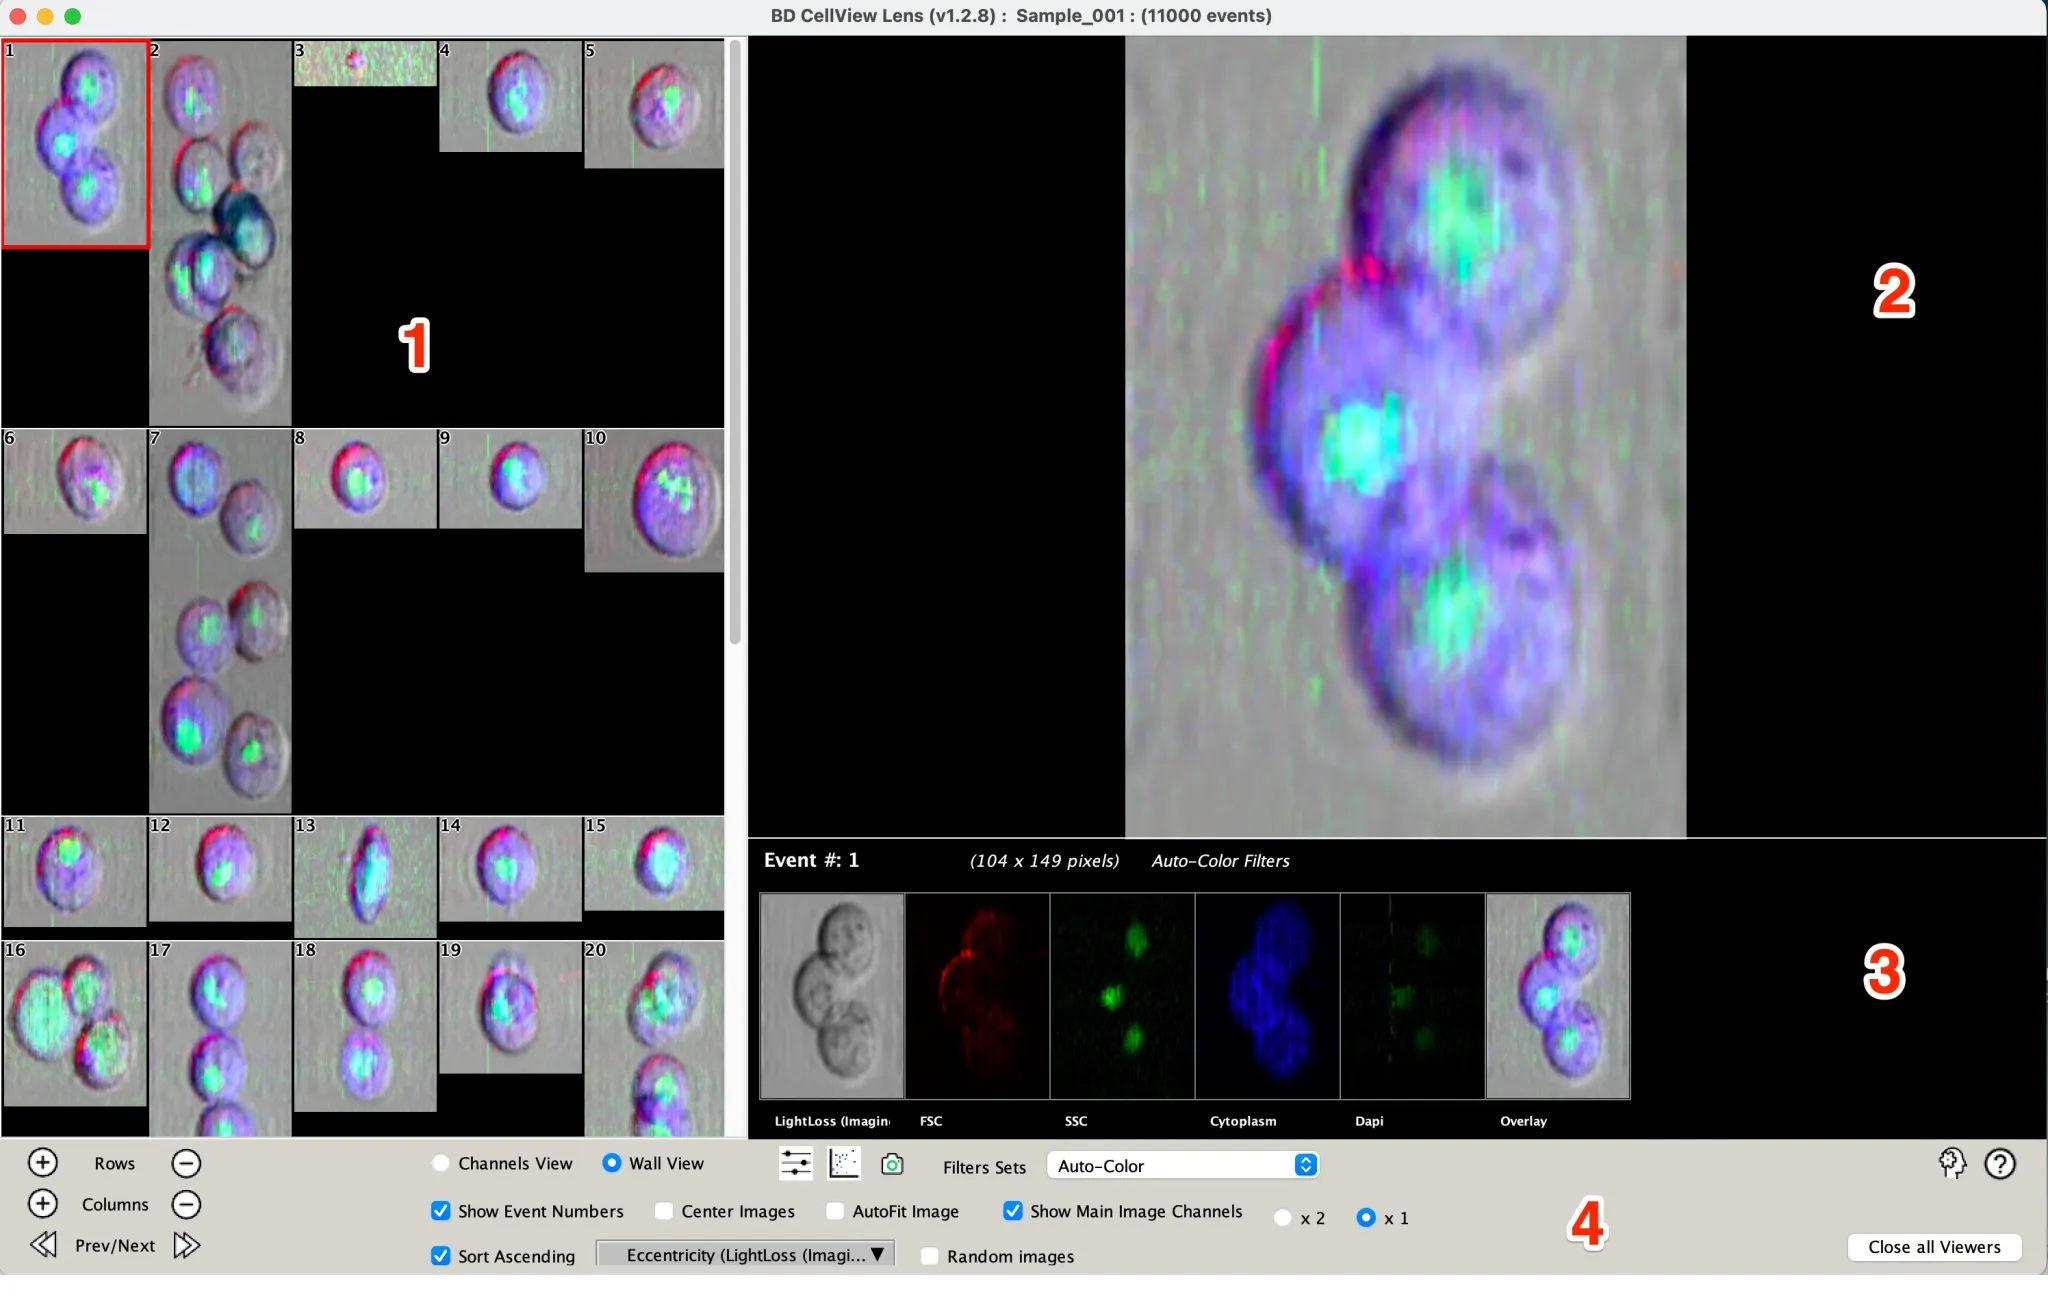
Once the file name mapping is complete, the Images Browser opens to display a wall of images, and one of the single cell images highlighted in the high resolution display panel. This panel shows the raw image in a higher resolution using linear interpolation of the pixels, as well as the image for each channel of the image data. You can click on an image in the image wall to change the highlighted single channel cell image, or click on one of the channels, of the particular image, located below the high resolution display panel, to show that channel in the higher resolution display.

| No. | Interface component | Function |
| 1 | Image Wall | Displays FCS event images in wall view. The default view consists of ten rows and five columns. |
| 2 | High resolution display panel | Displays the raw image of a selected single image from the image wall in a higher resolution using linear interpolation of the pixels. |
| 3 | Channels of selected image | Displays the selected single image in a number of channels. The number of channels displayed depend on the number of image fluorescence channels you had selected for your experiment in BD FACSChorus™ and are interpreted from the extracted TIFF image files. |
| 4 | Image display controls | Displays the controls to customize the display of images in the images browser. Allows you to view the extracted images for an index sort experiment by using the Index Sort Image Viewer window. |
Image Display Controls

Zooming in on the control panel at the bottom of the Browser, there are many options for optimizing your view:
- Rows / Columns: Expand or reduce the number of images displayed in the image wall
- Prev/Next: Displays the images of the next or previous set of cells as arranged by the sort option
- Channels View vs. Wall View: Channel view shows all of the imaging channels for each cell while Wall view shows the selected channel only for a larger number of cells
- Show event numbers: Overlays the number of the cell, by acquisition order
- Center Images: As visible in the screenshot above, some images in the image wall are much larger than others. This option centers the images per row.
- AutoFit Image: Fits the size of the high resolution image to the window size
- Show Main Image Channels: Shows the other channel images for the high resolution image. The x2 and x1 control allows you to double the size of the additional channel images
- Sort Ascending: Controls arranging the images in either ascending or descending order based on the selected parameter. By default, images are sorted by event number. Choosing a parameter allows for the images to be sorted based on some morphological feature.
- Random Images: Displays a random selection of cells instead of sorting by an image
- Filter sets: Adjustments made to the image filtering can be saved as filter sets, selected here, and applied.
 Image Filter Tools. Click this to open the controls for modifying the appearance of the images.
-
 Take Snapshot for Layout Editor. Click to add the current images to the layout editor.
-
 2D plot with mouseover. Click this to open the current population in the graph window and enable mouse over image display.
File Menu Options
There are three file menu selections associated with the CellView Lens:
View: Recapitulates the Image View Controls in menu form with associated keyword shortcuts listed.
Pref: Contains a pair of settings allowing the user to show placeholders and/or warnings for missing images.
Tools: Contain a plethora of additional tools that can be applied to images
- Take Snapshot for Layout Editor: Click to add the current images to the layout editor.
- Make Image File Gates: Creates a gate that separates cells that have an associated image from those that do not. Useful for index sorted data, that contains all of the non-indexed data.
- Run Slideshow: Cycles through each cell in the selection, promoting it to the high resolution plot.
- Export Selected CellView Population: Exports the current selection as an FCS file.
- Generate Image Files Report: Creates a text file listing all of the TIFF files used in the platform
- Open Image filter tools: Click this to open the controls for modifying the appearance of the images.
- Open Index Sort Plate View: Opens a dialogue to connect index sort plate information with the selected cells, and then opens a plate view of the data.
- Open Event to Image Mapping Tool: Reopens the dialogue for connecting images to cells.
- Open 2D plot with mouseover. Click this to open the current population in the graph window and enable mouseover image display.
Extending CellView Images to other Populations
The CellView Lens creates a node on the specific population it has been applied to. To view another population of cells with the same settings, simply drag and drop the node to that population.
