CHAPTER 1 – Altering an acquisition matrix
back to Compensation Workflow Overview
Acquisition matrices are defined by the $SPILL or $COMP keyword embedded within the fcs files. They are read and applied by FlowJo to the files automatically when the files are loaded.
Please Note: Altering these spillover values is not recommended unless it is done empirically. Visual manipulations will likely only introduce error in the compensation calculation. Good compensation matrices are derived from good compensation controls!
There are two of different ways in FlowJo vX to alter spillover values in an existing acquisition matrix. The two differ as to how they are applied to samples in the workspace.
- You can edit an existing matrix, which creates a copy of the existing acquisition matrix and a live compensation node in the workspace. Any changes to spillover values are immediately applied to your samples in the workspace.
- You can duplicate an existing matrix, which first must be edited and then applied to samples in the workspace.
You can also create an entirely new matrix with parameters of your choosing (See “Creating a New Matrix File” below).
Editing an Acquisition Matrix
To alter an acquisition matrix on a file, please follow these steps:
1) Double click on the grid next to the sample. This grid is the compensation element:

The color grid indicates that a compensation matrix has been applied to the sample. If this gird appears when the data are first loaded, this means there is a compensation matrix embedded in the file and FlowJo has applied it. Acquisition matrices are usually grey by default.
Double-clicking the grid opens the matrix editor :

FlowJo does not allow direct editing of the acquisition matrix to maintain the integrity of the FCS standard since these compensation values are stored within the file. Therefore, a copy must be created in FlowJo that can be edited.
2) Click “Edit” to make a new (live) matrix and modify any of the matrix spillover values.

3) A drop- down menu will then ask you if you would like to continue editing the acquisition matrix, click “Yes”.

A new matrix will be created and immediately applied to all samples in the workspace. If you are editing the acquisition- defined matrix, the default name will be “Acquisition-defined-copy” and will be assigned a new color (default is blue).
Matrix Editor:

Workspace:

4) Mouse over and click in a box in the matrix window to edit the existing values. Hit “Enter” or “Return” on the keyboard to finalize the value. The color of the box will change depending on the input value. The higher the value, the darker the shades of yellow/orange will be applied. We have entered a series of values (1 to 100) in the FITC channel to exemplify this (see image below, top row).

Of note while editing an acquisition matrix:
- Any of the values in this new FlowJo derived matrix can continue to be edited and will be applied to the sample(s).
- Changes to the spillover values will update the parameters displayed in the graph window
- To remove the altered compensation matrix from a sample or samples, simply go back to the matrix editor and drag the original (unedited) version of the compensation matrix back on to a sample or group of samples.
- when “resetting” the edited FlowJo matrix, remember that it was simply a duplicate of the initial acquisition matrix. Therefore, resetting any edited values will revert the values back to the same as the original acquisition matrix.
5) Once finished you can save your new matrix file to use with another workspace or export to CSV for further analysis. To save it click “Save Matrix” on the matrix editor window. A drop-down menu will appear with two file type options for saving.

Duplicating an Acquisition Matrix
To duplicate an existing acquisition matrix do the following:
1) Repeat step (1) from above (Editing an acquisition matrix).
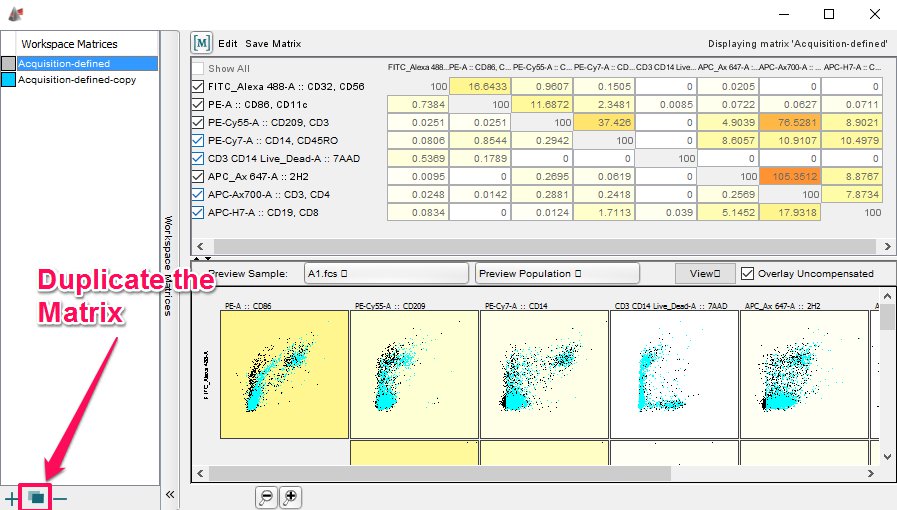
2) In the matrix editor window, click the “duplicate” icon in the bottom left corner.

If you are duplicating the acquisition- defined matrix, the default name will be “Acquisition-defined-copy” and will be assigned a new color (default is blue).
3) Mouse over and click in a box in the matrix window to edit the existing values. Hit “Enter” or “Return” on the keyboard to finalize the value (see step 4 from the “Editing an acquisition matrix” section above).

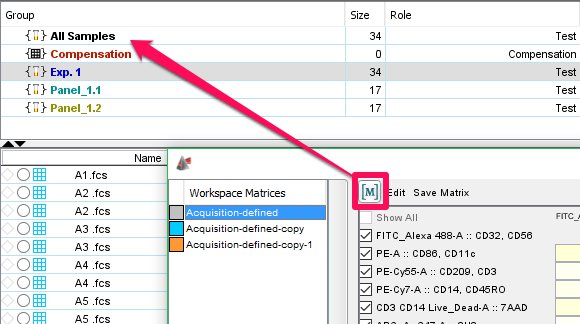
4) Once you have finished entering all values, click the  button and drag to a group or sample to apply the new matrix. The samples in the workspace will display a new color grid corresponding to the duplicated matrix. Your samples will now have the new compensation matrix applied to them.

5) To save your matrix file follow step 5 from the section “Editing an acquisition matrix” above.
Creating a New Matrix File
1) To begin creating a new compensation matrix, simply click on the compensation grid or ‘badge’ of a created matrix.

The matrix editor will open.

2) Next, click the “Create New Matrix” icon (‘+’) in the bottom left corner of the matrix editor window.

3) Select “New Identity Matrix” from the drop- down window.

You can also choose “From File” if you already have a saved matrix file that you wish to apply. If you have a previously saved matrix file, select “From File” to load it. The new matrix file will be displayed in the matrix editor window and can be immediately applied to samples by clicking and dragging the  button onto a group or individual sample. For the purposes of this tutorial we will continue with creating an entirely new matrix from scratch.
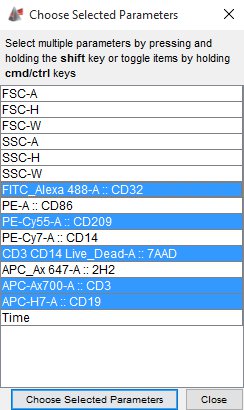
4) After selecting “New Identity Matrix” FlowJo will present you with a menu of parameters. Select the parameters to include in the final matrix. You can select multiple parameters by using the ‘Shift’ or ‘Cmd’/’Ctl’ keys. Then click “Choose Parameters” at the bottom right of the window.

5) The new matrix will be created and will have the default name “New Matrix”. The selected parameters will all have “0” entered as their default spillover values. (From step 4 we chose 5 parameters and these are displayed in the matrix editor window under “New Matrix”).

6) Edit any of the spillover values by mousing over and clicking in the box (Same as step 4 in “Editing an Acquisition Matrix” above).
7) Apply the new matrix by clicking and dragging the  button to a group or sample (see step 5 from the “Editing an Acquisition Matrix” section above).
8) Save the matrix file (see step 5 from the “Editing a Matrix File” section above.
*If you have any trouble, please email: techsupport@flowjo.com
Tags: FlowJo